Vue响应式之data

data 初始化时都做了什么

假设我们有这么一个 Vue 组件:

1
2
3
4
5
6
7
8
9
10
11
12
13
14
15
16
<template>
<div id="app">
{{ foo }}
</div>
</template>

<script>
export default {
name: 'App',
data () {
return {
foo: 'bar',
}
},
}
</script>

那么这个 foo 是怎么被 Vue 监听的呢?

我们定位一下 src/core/instance/state.js 文件,找到 initData 方法:

1
2
3
4
5
6
function initData (vm: Component) {
let data = vm.$options.data
// ...省略部分代码
// observe data
observe(data, true /* asRootData */)
}

在方法末尾,可以看到 observe 方法,跳转到这个方法 src/core/observer/index.js

1
2
3
4
5
6
7
8
9
10
11
12
13
14
15
16
17
18
19
20
21
export function observe (value: any, asRootData: ?boolean): Observer | void {
if (!isObject(value) || value instanceof VNode) {
return
}
let ob: Observer | void
if (hasOwn(value, '__ob__') && value.__ob__ instanceof Observer) {
ob = value.__ob__
} else if (
shouldObserve &&
!isServerRendering() &&
(Array.isArray(value) || isPlainObject(value)) &&
Object.isExtensible(value) &&
!value._isVue
) {
ob = new Observer(value)
}
if (asRootData && ob) {
ob.vmCount++
}
return ob
}

这步重点是 new Observer ,最终会返回一个 Observer 的实例。

跳转到同一个文件的 Observer 类:

1
2
3
4
5
6
7
8
9
10
11
12
13
14
15
16
17
18
19
20
21
22
23
24
25
26
27
28
29
30
31
32
33
34
35
36
37
38
39
40
41
42
export class Observer {
value: any;
dep: Dep;
vmCount: number; // number of vms that have this object as root $data

constructor (value: any) {
this.value = value
this.dep = new Dep()
this.vmCount = 0
// 在对象上定义一个 `__ob__` 属性
def(value, '__ob__', this)
if (Array.isArray(value)) {
if (hasProto) {
protoAugment(value, arrayMethods)
} else {
copyAugment(value, arrayMethods, arrayKeys)
}
this.observeArray(value)
} else {
this.walk(value)
}
}

/**
* 对 data 上的每一个属性都执行 `defineReactive`
*/
walk (obj: Object) {
const keys = Object.keys(obj)
for (let i = 0; i < keys.length; i++) {
defineReactive(obj, keys[i])
}
}

/**
* Observe a list of Array items.
*/
observeArray (items: Array<any>) {
for (let i = 0, l = items.length; i < l; i++) {
observe(items[i])
}
}
}

接着,我们来看还是同一个文件下的 defineReactive

1
2
3
4
5
6
7
8
9
10
11
12
13
14
15
16
17
18
19
20
21
22
23
24
25
26
27
28
29
30
31
32
33
34
35
36
37
38
39
40
41
42
43
44
45
46
47
48
49
50
51
52
53
54
55
56
57
58
59
60
61
62
63
export function defineReactive (
obj: Object,
key: string,
val: any,
customSetter?: ?Function,
shallow?: boolean
) {
const dep = new Dep()

// 用了 Object.freeze 就无法响应的原因
const property = Object.getOwnPropertyDescriptor(obj, key)
if (property && property.configurable === false) {
return
}

// cater for pre-defined getter/setters
const getter = property && property.get
const setter = property && property.set
if ((!getter || setter) && arguments.length === 2) {
val = obj[key]
}

let childOb = !shallow && observe(val)
// 定义 getter 跟 setter
Object.defineProperty(obj, key, {
enumerable: true,
configurable: true,
get: function reactiveGetter () {
// 尝试调用自身 getter ,如果没有直接返回 value
const value = getter ? getter.call(obj) : val
if (Dep.target) {
dep.depend()
if (childOb) {
childOb.dep.depend()
if (Array.isArray(value)) {
dependArray(value)
}
}
}
return value
},
set: function reactiveSetter (newVal) {
const value = getter ? getter.call(obj) : val
/* eslint-disable no-self-compare */
if (newVal === value || (newVal !== newVal && value !== value)) {
return
}
/* eslint-enable no-self-compare */
if (process.env.NODE_ENV !== 'production' && customSetter) {
customSetter()
}
// #7981: for accessor properties without setter
if (getter && !setter) return
if (setter) {
setter.call(obj, newVal)
} else {
val = newVal
}
childOb = !shallow && observe(newVal)
dep.notify()
}
})
}

看看这方法的名字,defineReactive ,肯定就是定义数据响应的地方了。

首先,我们看到:

1
2
3
if (property && property.configurable === false) {
return
}

这么一个判断,所以,这也是你用了 Object.freeze 后就能防止数据被监听的原因。

接下来我们可以看到里面来了一手 Object.defineProperty ,这里面给每个属性都定义了 getter/setter ,这也就是你在 console 打印 data 时会有很多 get set 的原因:

1
2
3
4
5
6
7
8
9
10
$vm0.$data
/**
{
foo: 'bar'
__ob__: {...}
get foo: ƒ reactiveGetter()
set foo: ƒ reactiveSetter(newVal)
__proto__
}
*/

我们发现,在 getter 中,除了调用自身 getter 之外,主要还执行了 dep.depend() ,这时候就要看看这个 Dep 类是何方神圣了。

src/core/observer/dep 中找到 Dep 类:

1
2
3
4
5
6
7
8
9
10
11
12
13
14
15
16
17
18
19
20
21
22
23
24
25
26
27
28
29
30
31
32
33
34
35
36
37
38
39
40
41
42
/**
* A dep is an observable that can have multiple
* directives subscribing to it.
*/
export default class Dep {
static target: ?Watcher;
id: number;
subs: Array<Watcher>;

constructor () {
this.id = uid++
this.subs = []
}

addSub (sub: Watcher) {
this.subs.push(sub)
}

removeSub (sub: Watcher) {
remove(this.subs, sub)
}

depend () {
if (Dep.target) {
Dep.target.addDep(this)
}
}

notify () {
// stabilize the subscriber list first
const subs = this.subs.slice()
if (process.env.NODE_ENV !== 'production' && !config.async) {
// subs aren't sorted in scheduler if not running async
// we need to sort them now to make sure they fire in correct
// order
subs.sort((a, b) => a.id - b.id)
}
for (let i = 0, l = subs.length; i < l; i++) {
subs[i].update()
}
}
}
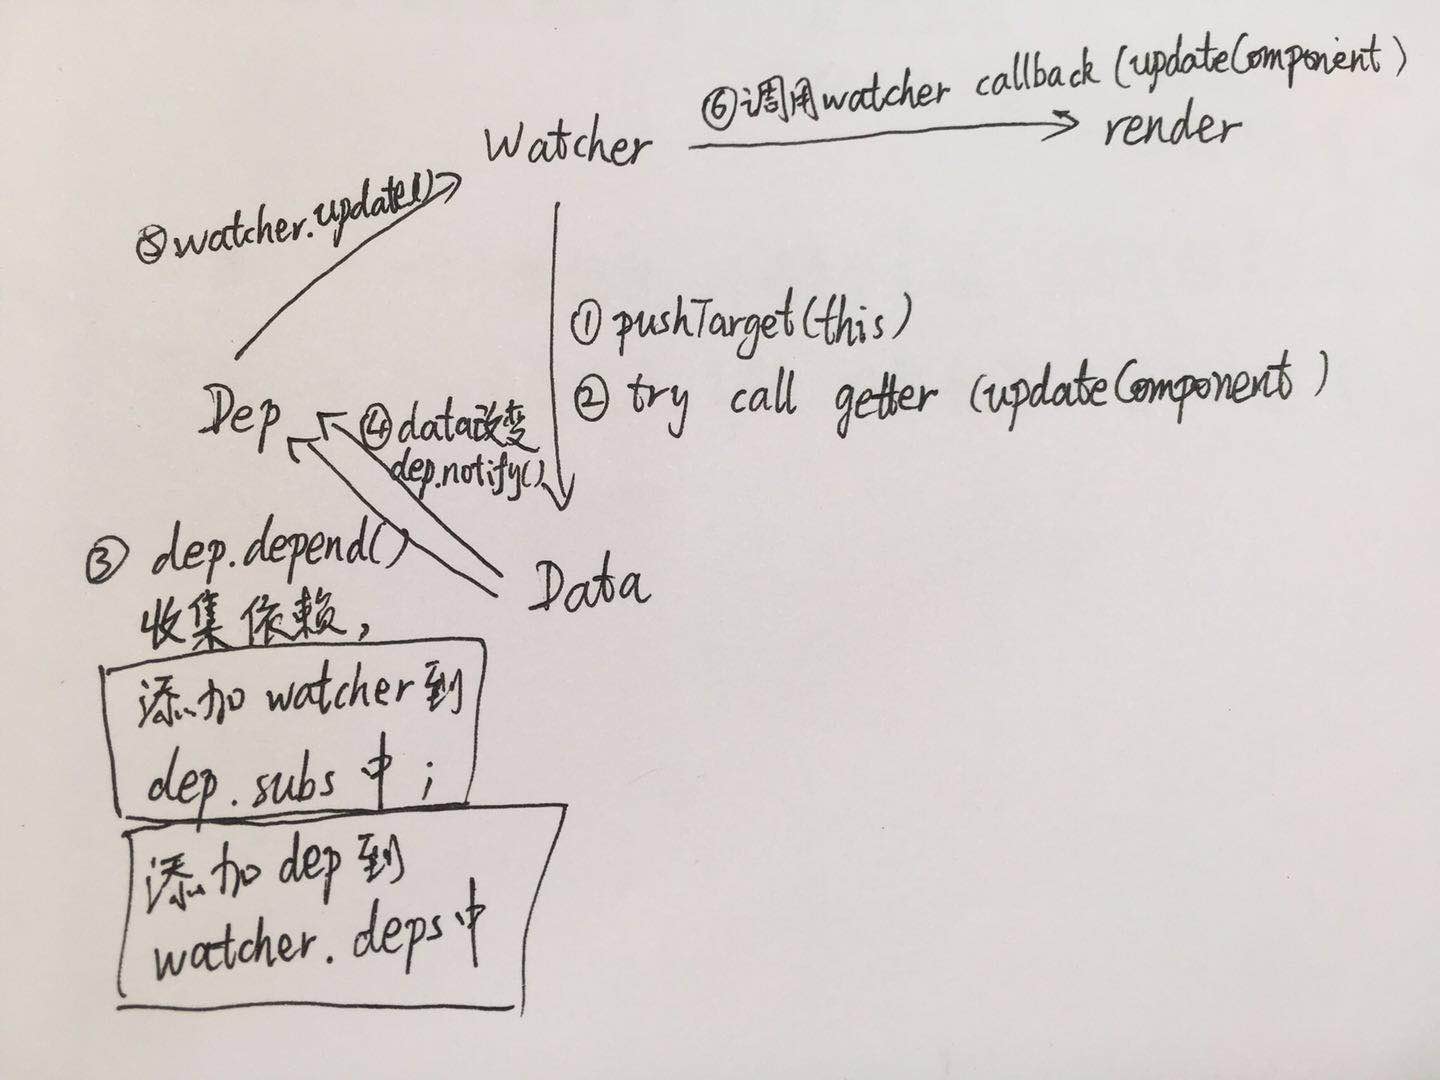
在这个类中,需要特别注意两个地方:

  1. Dep.target 是一个 Watcher 实例
  2. subsWatcher 实例的数组,而在 notify 方法中,调用了每个实例的 update 方法

看到这里,你脑海里是不是有个名词一直在晃来晃去的?这…不是有点像那个发布订阅模式吗?诶,不过我不是很了解发布订阅模式,没关系,我们慢慢看下去。

这时候,我们应该已经有个场景了:

  1. 数据变化会调用 dep.notify
  2. dep.notify 会调用 watcher.update

那还有个问题,就是 watcher 是怎么进入 dep.subs 列表的?也就是 watcher 是怎么订阅的。

由于我有稍微搜了一下代码,在这里我们就先不看 Watcher 类,而是先转到 $mount 方法:

我们可以找到 mountComponent 方法,在里面,有一段实例化 Watcher 的代码:

1
2
3
4
5
6
7
new Watcher(vm, updateComponent, noop, {
before () {
if (vm._isMounted && !vm._isDestroyed) {
callHook(vm, 'beforeUpdate')
}
}
}, true /* isRenderWatcher */)

了解到这个,我们再去看 Watcher :

1
2
3
4
5
6
7
8
9
10
11
12
13
14
15
16
17
18
19
20
21
22
23
24
25
26
27
28
29
30
31
32
33
34
35
36
37
38
39
40
41
42
43
44
45
46
47
48
49
50
51
52
53
54
55
56
57
58
59
60
61
62
63
64
65
66
67
68
69
70
71
72
73
74
75
76
77
78
79
80
81
82
83
84
85
class Watcher {
constructor () {
// ...省略部分代码
// parse expression for getter
if (typeof expOrFn === 'function') {
this.getter = expOrFn
} else {
this.getter = parsePath(expOrFn)
if (!this.getter) {
this.getter = noop
process.env.NODE_ENV !== 'production' && warn(
`Failed watching path: "${expOrFn}" ` +
'Watcher only accepts simple dot-delimited paths. ' +
'For full control, use a function instead.',
vm
)
}
}
this.value = this.lazy
? undefined
: this.get()
}

get () {
pushTarget(this)
let value
const vm = this.vm
try {
value = this.getter.call(vm, vm)
} catch (e) {
if (this.user) {
handleError(e, vm, `getter for watcher "${this.expression}"`)
} else {
throw e
}
} finally {
// "touch" every property so they are all tracked as
// dependencies for deep watching
if (this.deep) {
traverse(value)
}
popTarget()
this.cleanupDeps()
}
return value
}

update () {
/* istanbul ignore else */
if (this.lazy) {
this.dirty = true
} else if (this.sync) {
this.run()
} else {
queueWatcher(this)
}
}

run () {
if (this.active) {
const value = this.get()
if (
value !== this.value ||
// Deep watchers and watchers on Object/Arrays should fire even
// when the value is the same, because the value may
// have mutated.
isObject(value) ||
this.deep
) {
// set new value
const oldValue = this.value
this.value = value
if (this.user) {
try {
this.cb.call(this.vm, value, oldValue)
} catch (e) {
handleError(e, this.vm, `callback for watcher "${this.expression}"`)
}
} else {
this.cb.call(this.vm, value, oldValue)
}
}
}
}
}

可以看到,实例化后马上执行了 get (不是 lazy 的时候),而在 get 中,执行了 this.getter ,这个则是 mountComponent 中定义的 updateComponent 方法,在这个方法中,执行了 _render ,那么,如果在模板中有用到 data 的话,则会去执行 defineReactive 中的 getter ,例如:

在最开始的例子中,我们的模板是这样的:

1
2
3
4
5
<template>
<div id="app">
{{ foo }}
</div>
</template>

这里用到了 foo 。于是会执行 foo 上的 getter ,里面有个 dep.depend() 再加上 watcher.get 的时候执行了 pushTarget(this) ,因此此时 Dep.target 指向的就是 mountComponent 中的 new Watcher 。这一连串操作成功将这个 watcher 添加到 dep.subs 列表中,以后每次 foo 改变,都会调用 dep.notify 具体执行下去,就是每次都会调用 updateComponent ,从而达到更新 DOM 上 foo 的值的效果,也就是实现了一个响应式的过程。

大致流程

process

经历 ①②③ 步骤收集依赖到 watcher 后,每次 data 改变,都会执行 ④⑤⑥ 步骤,从而实现响应。